Showing posts with label sewing. Show all posts

Thursday, January 27, 2011

Warm weather outfits

Yes, I'm back. I kind of lost interest for a while. Lost interest in this and even in reading others' blogs. I found I spent more time blogging than doing anything worth blog. I think a lot of people go through this from what I've seen on others' blogs. Anyway a new year and some changes plus I miss the friendships I've formed and I think I have room for it again. I guess we'll see...


But in the meantime perhaps we'll have a share and I'll show you what I've been up too. I have popped in on many of your blogs from time to time so if there's something I've missed, that you think I'd enjoy, how about you share the link in the comments.

First up I've been sewing heaps. I made most of Rainbow's warm weather wardrobe. It looks like favourtism but Moonshine has soooooo much clothes that it's silly. She's also still at an age where one enthusiastically devoured ragu will send her outfit to 9 rounds of the washing machine before meeting it's untimely disposal. Her time will come.

This skirt is a free tutorial from the blog House on Hill Road. It's very easy though Rainbow likes quite simple clothes and finds the dangly ribbon tiresome. The same goes for the ribbon around the pink dress. The capri pants are New Look 6719.


These department store shirts have been appliqued to wear with the pants and skirts without being matchy matchy. I made two more - one you can see a little of the flowers on Rainbow in the last post. The other was for Moonshine and has been disposed off - case in point! Sorry I didn't iron them! A few close ups..
The bilby is fake fur and I just love how it turned out. This is a new pattern for me Simplicity 2377. It's very easy and has another variation with two tiers. They're easy to make though elastic casings are small so a little fiddly. Also Rainbow finds them hard to put on as there is no give in the bodice to squeeze your shoulders through and she is not a big kid.

I also used this pattern to make a fairy dress. Around this time Rainbow's two fairy dresses, which were gettting heavy use, were getting very short and the weather was getting too warm to wear leggings or stockings underneath. I only found one pattern for a one piece fairy dress but on closer look found it was going to cost about $40 to buy the fabric. Instead I lengthed the top and added a gathered piece of netting with the skirt to make a fairy dress. I'll show you this dress again soon as it's getting "blinged" at the moment.
Another new pattern Simplicity 2376. I normally am drawn to brighter colours but I really like the fairy fabric one. Rainbow calls them Grandma fairies!
I sewed four pairs of pyjamas for each girl (two long, two short) using Simplicity 2734 and my new overlocker skills.
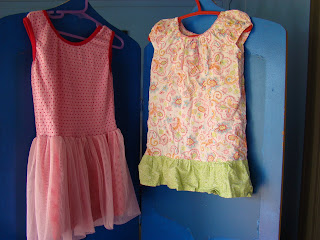
I also did a little restyling. The dress on the right is Moonshines. In it's former life it was a one piece jump suit. Neither of my girls could ever wear it as their chubby thighs kept bursting open the press studs. So I cut it off and added a frill and it turned into a very wearable dress. The one on the left started out as bathers. When they lost their stretched they too were chopped and converted into a fairy dress.
Finally a little tease: I made a dress for Rainbow's birthday with one of her pictures hand embroidered on the front. This dress uses New Look 6719. Can you guess what type of party she had?

I'll share that next time.

Monday, April 26, 2010

That Dress

I finally finished the two knit dresses that provided me with so much angst.


I'm pleased with how they turned out. Having sewn two of these dresses it's actually quite an easy pattern, though I'm a bit inexperienced at setting seams. It also looks comfortable on. It's such a retro style - I can imagine myself wearing it fifteen years ago (still retro as it's really my Mum's generation) with knee high boots.

End Note:
Here's Moonshine (with a few toys she brought over) climbed onto the tea trolley with the overlocker, waiting for Mama to finish sewing and come and play.
I know this photo isn't in focus but I love the cheeky look on Moonshine's face.

Saturday, April 3, 2010

Nest + handle = basket

Yesterday I made a nest basket using the nest pattern I a few months back. I adapted to make the point (base of the basket) bigger and the rectangular portion (height of the basket) shorter. I made it with a felt outer and fabric inner with the intention of appliqueing and embroidering flowers on the front but time got away. It's a little too flimsy to use as an egg collecting basket but looks good displaying the rainbow dyed eggs.

In these photos it is holding cupcakes for a morning tea at my mother in law's house. It is also resting on a plate to hold it secure when I carried it.
These little cupcakes are topped with chocolate icing with a border "Flake" to resemble a nest. You could use grated chocolate if you don't have flakes in your part of the world. I had hoped to use those little bird's egg sugar coated chocolate eggs but couldn't find any. They are my little brother's favourite so I'll have to see where he gets his.
Some of the eggs have already hatched!

And here are the girls. Rainbow insisted that she needed an Easter egg dress - a little short notice for me but we agreed that polka dots look a lot like eggs. Hence both girls are in polka dots.

I just looked up to see both girls eating chocolate eggs when they should be eating their dinner. Russell and I are off to dinner (only the second time since Moonshine's arrival) for our 6th wedding anniversary. Please cross your fingers that Moonshine sleeps until we return.

Saturday, March 27, 2010

A long post without pictures!

This is the first time I've had internet since Monday. We had a massive storm hit Perth on Monday. Having had no rain for just over three months we had about 6 cm in about an hour. Our little city doesn't get 'natural disasters' so we're ill prepared. At our house it was very exciting, Rainbow and I had been Rain dancing and chanting during the afternoon. Then when it started to sprinkle Rainbow rushed to get her puddle stompers that she got from Santa but the drips were quickly soaked up by the dry earth. Then as the rain hit we were bombarded with marble sized pieces of hail. (North of the river they had golf ball sized that carpeted the ground. I was running out collecting hail for Rainbow to eat. Then the lightning started so Russell and Rainbow watched from the dining window. It got closer and closer until there was this mighty crack (just like glass breaking) as a strike hit our big gum tree. The effect is amazing the branch exploded, I guess from the moisture inside the branch and there is a trail (about 2 cm across) where the lightning travelled down to the ground. I think we were very lucky not to have our windows blow out. At that point the lights went out. There were more than 60 000 homes without power so we were in the dark until Wednesday night. When we eventually had our power reconnected we discovered the strike had blown up our television (plugged in but not turned on), our alarm system, our phone splitter and our modem. I guess that's why you don't make phone calls during a storm.

On top of that Rainbow has had tonsillitis and Russell and Moonshine have had gastro so I've been bouncing back and forth from one bedside to the other all night long. Over one two hour period I spent ten minutes and two five minute periods in my own bed.

So with out power I've had a imposed break from my sewing and now things are going a little smoother. Thank- you very much Zoe, Trixi and Deb for your much appreciated words of encouragement and advice. I've been paying closer attention to my children's brought knit clothing and it's very interesting.
  • Rainbow has a knit dress that when you pull at the seams they do gape and show the stitches. It's a pricey brand (by my standards though I got it quite reasonably on sale) so I'm reassured that perhaps that is what is meant to happen.
  • Moonshine is wearing a gorgeous knit top today (also a pricey brand - though Moonshine's was second hand) made of a fabric similar to the dress pattern - with rows of hearts and sure enough they have made no effort to match the seams and as Deb pointed out you don't really notice as you don't spend a huge amount of time with your arms up in the air.

I also decided to put away the heart stripey fabric and have a go with a different fabric first to get to know the pattern. I didn't do this initially as it meant changing my overlocker thread and that has it's own challenges. The pattern is quite different to other patterns I've used. The neckline for example has the raw edge zig zagged on the front of the dress where I would have expected it to be done similarly to bias binding on a quilt. I also haven't set sleeves in for a long time. On saying that I think it's looking quite good. I just need to buy a double needle (I haven't used one before) and finish the hems then I'll give you a look.

I haven't learnt from my stripe incident yet. I went fabric shopping on Thursday to try as I was feeling down. After half an hour I was totally lacking inspiration then I remembered my Mum's advice. Choose a fabric that you like and go from there. I came home with a set of cottons to make a ra-ra skirt for Rainbow and this gorgeous print to make a dress for Rainbow. When I got home I realised the gorgeous print is an enormous flower print. Is it going to look funny at the seams? Will I ever learn???

Hopefully I'll get a chance to come visit your sites soon. I've also got a few things I want to share so hopefully I'll get internet soon.

Friday, March 19, 2010

sewing trouble

I had a ‘challenging’ sewing / pattern cutting day yesterday. .I’ve psyched myself out by choosing fabric that is too far beyond me. I’m hoping that someone reading this may have had some experience sewing knits and could give me some guidance or (encouragement). Interestingly the last project I tried making with knits was a long sleeve wrap dress from 2003 which still isn’t finished. I’m hoping if I can get pass this maybe I could return to that dress as I still like it.

Firstly I’ve only used an overlocker (serger) to finish edges. In fact I haven’t used it for years. I’ve just had it serviced and brought new thread. Now I’m trying to learn how to use it for a seam. My biggest problem is that my seam seems to gape when stretched so that you can see the seam. Now I understand that the point of a overlocked seam is because it keeps the elasticity but I’m not sure this looks right.

Secondly I went and made it even more complicated by choosing a stripe. The pattern is also directional so I have to ensure the big hearts face up.

First I folded the fabric so that the pattern matches up. I find the fabric easily stretches which distorts the lines.
After a lot of thinking I worked out that I would need to match the sides along the sewing line not the cutting line. I matched the side seams of the cut front panel and the back template. Then rolled the front panel over 1.5cm so that I could see where the dress seam would lie.

I cut this out and sewed it and realised that though the colours match, the pattern is disrupted at the seam. Straight lines would probably have been easier. After a lot of playing, I realised that because the side of the dress is not perpendicular to the pattern I would have to lie the back piece on an angle rather than along the grain. This would cause three problems
  • pattern would be on a diagonal
  • pattern wouldn’t match on other side seam
  • fabric wouldn’t stretch correctly with movement.
Next I went to cut the shoulders and realised because they go out over the shoulders before dropping to the wrist that I can’t match the coloured stripes at the shoulder and along the length of the arm. I’ve tried to for the length but am unsure how this will look.

Then when I had a go at sewing up I realised the instructions actually started on the previous page and I had started from the third step. I’m kind of ready to bundle it all back on my sewing table.

PS I don’t even know if I like this fabric (especially for a winter dress) and it was expensive by my stingy habits!

Friday, January 15, 2010

those eyes - a baby for my baby

Those eyes are inspired by

and seen on
A new baby for Moonshine's birthday. Moonshine loves dolls. She spends a lot of time giving them cuddles and often crawls about with a little plastic doll under each hand or a doll sticking out of her mouth.


This doll is using the free black apple tutorial. The tutorial is very simple to follow though I must say I had some problems with fraying and ended up starting again and zigzagging all my edges. She's also a little asymmetrical but I'm telling myself that adds to her individuality. I also think a doll has to be able to stand up to a lot of use. It's a good doll for a baby as it has no loose parts.

Wednesday, January 13, 2010

Hatching Inspiration

At the moment, with it being less than a month to her first birthday, it's all about Moonshine.
I've got two homemade presents on the drawing board.
Well the first is actually done. I'll tease you with a peak. Do you recognise the eyes? They're inspired by a animated television character from the 80s.
Have a guess in the comment section. I must admit I can't see it now that it's sewn.

Present number 2 is a nest full of baby birds. I've played around with a few ideas. At first I was thinking something realistic looking like and I wanted it to be interactive. Given that a one year old loves filling and emptying but still has limited motor skills, the objects needed to be a shape that stood stabely and would fit into the nest easily. So I googled "flat based birds"and one of the images I got was a little EGGie. He's basically a modified 4 panel ball pattern and goes together really easy. He's cute in a goofy kind of way with those big eyes. Wouldn't he make a cute Easter Presents.
But..... Add bird paraphernalia (wings, a tail, eyes and a beak) and you have a hungry little chicks. I' haven't quite worked out the face but I'm thinking upward looking eyes imploring Mama bird to "Feed Me, Feed Me"
So here's my first prototype in calico on the right. On the left is a more bird like bird that I played around with. This one has a rocking base that Rainbow enjoyed playing with. This one also is really easy to piece together. I used this chickummyjig pattern. Oh by the way I printed the templates at 50% for both, making the egg shape one about 6cm tall.
Here is the side view.

I'd already brought the fabric. The purpley hues were to mix and max for the birds while the green were for the nest.
But when I tried it out. I was more drawn to the natural calico. I also am really enjoying embroidery at the moment and calico is nice to work with.

So next thought calico with fabric paraphernalia.
Meanwhile I'm thinking about Flip and Flap and Flutter. The birds from "Stellaluna". I'm also finding the tiny beaks frustrating.
So opt for felt with her name embroidered above her downward facing tail. Her eyes will be embroidered too.
She looks a little like a flamenco dancer with those wings. Perhaps she needs something on their head or a rose between her beak.

Wednesday, January 6, 2010

Bilby Costume

I'm honoured today to be a guest on Playing by the Book where I'm sharing some of Rainbow and my favourite Australian literature. By co-incidence today I completed a very Australian project.

On Friday Rainbow is attending a party at the zoo - costumes optional. So of course what's Rainbow's favourite animal - a bilby.

Look at these babies aren't they adorable. The weather's likely to be in the high 30s so know full on fur. Though bilby's survive very well in the desert - though their days are spent deep in their burrows.

For a long time Rainbow loved Alison Lester's series about the five kids. In "Clive eats Alligators it goes through what each child wears - stripey pants, overalls ... and Tessa wears a tail. So here is Rainbow's bilby tail and ears...


I can't imagine too many people will ever need to make a bilby costume but it could be easily adapted for any other animal (rabbit ears or tiger's tail). I'm already starting to think Easter bunny ears - with white fleece and pink satin and positioned on top of the head, maybe even one droopy ear.
Bilby's ears are made of fake fur and polar fleece. They have a wire insert to give them a little strength - bilbies need their erect ears to hear predators (mostly dingos) and keep cool. The wire is then wrapped around the headband. The headband is then wrapped with polar fleece.


Oh and here's my own baby bilby.

Monday, January 4, 2010

Bendy Santa riding in Cardboard Sleigh - Tutorial

As I mentioned yesterday this little Santa is based on a little Waldorf elf ornament. He comes together very easily and is very enjoyable to make. A lovely little hand sewing job for those quiet moments. He's also made of things that I have around the house.

You'll need:
  • a little red and white felt (maybe some black if you want to add a belt or green if you'd like to make an elf)
  • a pipe cleaner (ideally white, red or skin toned)
  • embroidery thread (white, red)
  • 1 x 1.2cm wooden bead
  • 4 x 0.6cm wooden beads
  • hot glue gun

How to:

1. Cut out the outfit from the red felt.


2. Cut thin strips of white felt. Use blanket stitch to attach to the ankles, wrists, base of the hat. I also attached a neckline around the neck slit.

3. Fold pipe cleaner to form the body. (oops must add a photo)
4. Slip outfit over Santa's neck. Wrap one leg around and sew together at inner leg.
5. Wrap other leg over so that it overlaps on Santa's bottom. Sew from the inner leg from the ankle all the way up to the waist at the back.
6. Fold outfit over at the back and sew together. Start at one wrist and sew across to the other wrist following the edge of the fabric.

7. Pop on his head, hands and feet. A little glue will make it more secure.

8. Sew the hat together.
9. Secure Santa's hat with another drop of hot glue.
Optional Extras
  • draw or paint on a face
  • add a loop of embroidery thread / fishing line to hang him from your tree.
  • pose him as you will

If you'd like to make a sleigh

I glued the template onto a cereal box and cut out.

Rainbow decorated with textas and collage material.

I cut out the box, folded and secured with PVA.

Saturday, November 21, 2009

Making a Mermaid Costume

This weekend we went to a mermaid party so obviously the girls needed a little transformation.

From my internet surfing I found you have two options a tight skirt that frills out at the bottom or a long skirt with a fish tail hanging off the back. I opted for the later because it's a more literal translation for a two year old and more practical for playing. Interestingly it was the costume style worn by every mermaid at the party. Unable to find a tutorial to create the skirt I imagined I created my own. I'm very proud of this as it's the first piece of clothing I have made of my own design.

Material

Another positive is that both costume cost less than $10. I brought 50cm of a aqua chiffon like fabric with a glittery silver pattern and 30 cm of aqua netting (for merbaby). You could use any pretty mermaid like fabric.

For the lining I used 70 cm (50cm if you're just making a mermaid skirt) of aqua cotton that I had at home. You also need a small piece of batting, matching thread and elastic.

I used a papery fabric that is used for tracing patterns. You could also use calico or a cheap cotton.

Process
  1. Draw up a dummy skirt. This will become your template for the eventual skirt. Here is the pattern soon to be added. It's all straight lines so really easy to draw up straight onto the fabric.

  2. Cut out the dummy skirt and sew it together at the sides using a 1.5 cm seam allowance (or what ever seam allowance you intend to use .

  3. Fold over about 2.5 cm at the top. This will form the waistband.

  4. Ideally try it on your child now and mark the top of the knee in the middle of the front piece and their ankle in the middle of the back piece.

  5. Lie the dummy skirt on the floor (remove the child first) with the skirt folded so that the middle of the front piece is on one side and the middle of the back is on the other side. In other words the seams are lined up in the middle. This will enable you to get a symetrical template.

  6. Now draw in the hem line. It starts (at the bottom of the photo) just above the knee (remember the mark you made). It travels across then gently curves and ends in line with the ankle mark. From here draw on your tail. This was my draft - my husband made it a little more fish like. If I make this again I would make the piece where the tail joins on wider to make turning easier.

  7. Cut along your line through both layers.

  8. Unpick your seam. This will give you your pattern.

  9. Pin your pattern to your fabric (cotton and chiffon). Cut a top and bottom out of each fabric.


  10. Sew the front and back pieces together at the side, right side together. Repeat using the lining fabric.

  11. Turn the top layer so that the right side is on the outside. Place the lining skirt inside the top layer. The two layers should be right sides together and the seams and edges should match up.

  12. Lie batting ontop of the fish tail and cut out. By lying the battin on top of the chiffon the edges get tucked behind the lining layer where they aren't visible.
  13. Pin together along lower seam and tail. Sew.

  14. Re-enforce the tail by going around it with a zigzag stitch.Then trim off the excess close to the zigzag stitch.

  15. Turn the skirt throught the open waist so that the right side is on the outside. This is where a wider tail opening would help. I eventually unpicked the stitches around the tail and closed the edges afterwards.

  16. Top stitch around the bottom hem and tail.

  17. Turn over a 2.5cm hem along the top with both layers together. Insert elastic.

  18. Sew along the bottom hem using a gathering stitch (longest stitch length, low tension). Pull the bobbin thread to gather the bottom hem into a frill. Sew along basting with a normal stitch.
  19. A dangly tail can get in the way so add a matching button on the waistband and a buttonhole on the end of the tail.


It's kind of like a mermaid bustle. Alternatively you could add a small loop of cord or ribbon to one end of the tail so that it can be looped over the wrist.

There you are your skirt is complete.


You might like to whip up an applique t-shirt using the scraps.


You can find this little fish here.


Or a matching hair lacky. This is very simple just cut any matching fibres (strips of tulle, ribbon, wool...) about 15cm long and tie them around the hair lacky until the circle is complete,