Showing posts with label Rainbow. Show all posts

Thursday, February 3, 2011

Rainbow's Party Part 1

Did you guess the party theme from the birthday girl's party dress?

Yes Rainbow had a Rainbow party. A colourful theme for a colourful little 4 year old. Photos with details and without guests are a little light on but here we go.. There also all at the bottom of the post as Blogger is being 'uncooperative')

We decorated with the park with colourful balloons and a painted rainbow.

The rainbow is now blu tacked to Rainbow's bed head.

The table had a rainbow runner and lanterns.

Food
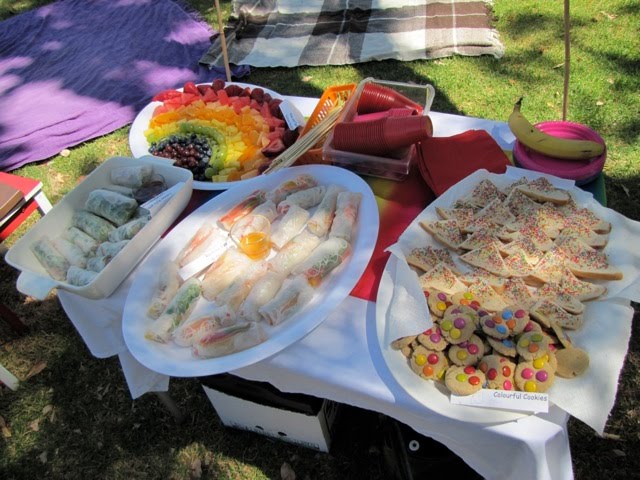
Rainbow's Uncle Phil made summer rolls with a partial rainbow of fillings (red capsicum, carrot, snow peas) some included lemongrass pork and were served with nuoc cham. One Grandma made a rainbow platter of fruit, so the children could make their own rainbow skewers while the other Grandma made fairy bread. We also had Smartie cookies (cook at 160 to avoid smarties cracking), Rainbow jelly and Hotdogs cooked by Uncle Ben.

Followed by the Hidden Rainbow Cake. This made quite an impression though I think it tasted like playdough but that was probably a mind trick. I used the white cake recipe from Martha Stewart but would probably just choose a yellow cake that I liked next time. I used a butter frosting. I wanted to try Swiss Meringe frosting but decided to stick with what I know. The little doll on top of is a Le Vans doll house doll which I dressed to match Rainbow's dress. She's holding (with a little help from a pin in her dress) a lollypop with a paper 4 on it. (just wet and press on)

For entertainment the kids could make rainbow felt flowers as shared by Montessori Mama. The kids wore these as wrist corsages and in their hair. You can just see Rainbow's on her wrist. To make it easy for me to cut out that many flowers in advance, our flowers were star shaped.
We also played a colourful and co-operative (rather than competitive) version of musical chairs. We spread out lots of hoola hoops. I called out a colour and the kids had to stand in a hoop of that colour. To win everyone had to be inside a correctly coloured hoop. As the game progressed we removed hoops so that the children had to work together (inviting, sharing, squeezing in and balancing) to ensure everyone could fit in the hoop.



Favours We ended the party by giving out rainbow bibs to the babies and the "treasure chest at the end of the rainbow" to the kids. For these we used the template we used for our mermaid board game.


We filled this with a mirror with instructions for making rainbows at home, a box of smarties, Rainbow lolly bracelet, a Killer python and loose colourful lollies (skittles, jelly beans).

Wednesday, January 26, 2011

Rainbow and the Twenty Eight


We had a picnic at Yanchep NP yesterday and Rainbow made friends with a Ring Necked Parrots. Most people call them 28s as that is what their call sounds like. This one was a juvenile and I think was supplementing his seed diet with 'picnic' foods. As you can see Rainbow was very excited by her new friend.

Monday, March 29, 2010

A different perspective

I would say I'm very against little girls in bra tops. Immediately the issues of sexualisation of little girls and girls as young as 3 developing eating orders in the pressure to look as society expects.
But tonight I saw the other side of the picture.

Rainbow found two breast pads that I'd removed from my bathers and was proudly wearing her boo boos (breasts). As I carefully helped her put her pyjamas on while holding her boo boos in place I momentarily thought about sewing her a bra to hold her boo boos in place. I then watched her sit on my bed and lovingly give her baby boo (breastfeed). I must point out here that all of her and Moonshine's babies are bottle fed despite that Rainbow was a very enthusiastic breastfeeder and Moonshine still is.

I suddenly saw the other side of little girls in bra tops. The desire to be like their mothers and do as their mothers do.
PS This is an old photo - I felt rude offering you another post without pictures. It's of Rainbow pumping not long after Moonshine's birth.

PPS There's still no chance of Rainbow getting a bra top! (handmade or otherwise

Friday, March 12, 2010

Stringing Along - part 2

Two more string painting activities.
Gluing with String

Alright strictly speaking this first one isn't actually painting though it works well if you mix 50% paint with glue.


Simply dip in paint or glue / paint mix and place on paper.


In true Rainbow style, her's is a little minimalist.

Variations

  • Adding paint to the glue as described at the start.
  • You can use different types and colours of wool.
  • If you have lots of overlapping pieces of string, you can then fill in the shapes that you make with different collage materials.

String Relief

The first activity wasn't really painting and this next activity isn't actually string - it's noodles. We did this one day after having noodles for lunch. You could use any pasta for different effects. Cook as per normal. Now this part is very important - don't rinse the pasta. You need the starch for it to adhere to the paper. If you want to store the pasta to use later - store it in water, in a food container in the fridge.

This activity starts as for the early one. The drained pasta is laid out on the paper. This is Rainbow's work - a worm.This second one we did together. We used a piece of recycled paper and the dampness of the pasta has caused the ink to run. This isn't part of the effect but just a note of interest.

Once it's dry you paint over the whole page. A dabbing motion on top of the pasta is quite effective. You could try painting inside the shapes formed by the pasta or just randomly.

Once the paint's dry you carefully peel off the pasta.


As you can see beneath the pasta is the white paper. Some of our lines are thick in part as sometimes the pasta would pull of some of the surrounding paint. I'd like to try this again with watercolour paints.

Wednesday, March 10, 2010

Stringing along - string painting part 1

This year we're exploring little themes in painting. I haven't really planned it that way but once one material is in the paint caddy it's easy just to keep going. It has been interesting to explore similar tasks over several days. I'm also hoping as the year progresses Rainbow will start doing the "I wonder what would happen if..." thinking along with me.

Recently Rainbow and I have been painting with strings. I'll share the four activities over two posts as I'm a photo short of one activity.


Materials
For all of these activities we used poster paint and wool. Other textiles would be great to explore.


String Painting

This is basically using string as a paint tool. Dip the length of wool in a tub of paint. I like to squish it around with my finger to cover it in paint.

Some ideas
    • lie the wool down in a design and then lift it up.


    • rapidly splat the wool up and down.


              • rapidly fling the wool over your shoulder onto the page (Warning: this is very messy and very fun. A similar activity is in this splatter painting post) My three year old found the over arm movement quite challenging.


                String Stretched Butterflies

                  One of Rainbow's favourite art activity is making paint butterflies. You know the ones where you put splats of paint on one half of a page then fold it in half. When you open it you have a symmetrical painting that often resemble butterflies. Well this is a variation.

                  1. Prefold the paper.

                  2. Spoon or squirt some paint on one side, close to the fold line.

                  3. Lie several pieces of string on the page so that both ends hang over the edge and the middle of the strings lies between the paint and the fold line.
                  3. Fold the paper over. Don't press down just yet.
                  4. Get a friend (or Mum) to hold the paper closed as you grab the two ends of the string. (Make sure you grab the ends of the same piece). Slowly pull both ends towards you. Repeat for each string.
                  5. Open up and check it out.


                  Here's another one with different wool positioning.


                  The dragged paint almost gives the butterfly movement. I'll show you a little project using these paintings soon.

                Tuesday, March 2, 2010

                Firsts

                Guess who drew this?

                Yes, it's Moonshine's very first piece of art. She kept at it for quite a while and was very interested in trying out all of the textas. Though in true one year old style she was paying attention to all sorts of going ons in the room as she drew.

                It's got me thinking about how I can include Moonshine in some of my Rainbow and my craft sessions - particularly when she eventually gives up her morning sleep.


                Also as far as firsts go - Moonshine is doing a little walking. I say a little as the most she's done is 5 steps and the steps are not necessary in the direction she's heading. She took her first step about two weeks ago and it (like most of her walking ventures so far) was from where she was sitting to me. She's a true Mama's girl at the moment.

                Something else exciting that's changing around here is Rainbow's drawings. Her drawings appear to be showing her experimenting with conventions. We've seen the addition of sky and some background information and also she's playing around with animals facing side on rather than towards the audience (as you'll see in the next photos). I remember touching on the development of drawing at uni but it's amazing watching it first hand.

                Let me show you this sequence. These drawings are all elephants, drawn about 4 months apart.

                This is mid June 09. This was one of her very first drawings. It has a smiley face, a trunk in the air and a tail.
                This is mid October (I think). It's a bit hard to see but it now has more correctly positioned ears, tusks and a trunk and four legs.


                This was last week. The face is still facing the audience but the trunk is now in the direction it's heading. Absolutely fascinating....

                For me at least!

                Thursday, February 25, 2010

                Mermaid's Treasure


                Here's a little game that Rainbow and I whipped up. The board is so simple to put together. The drawings show what we saw down the river on Sunday. Can you spot the jellyfish with all of it's tentacles, the fish, the seagull with it's long legs and the man standing on the jetty?
                The long line at the top is the sky. This is the first time Rainbow has included it in a drawing. Here is the link for the treasure chest it's filled with chocolate coins and a piece of sea glass.
                This game is quite challenging for a three year old. She only recognises 1,2 and 3 and doesn't really have one to one correspondence - in other words she counts and moves the mermaid forward but not at the same rate. She also gets distracted by who's turn it is and also tries to move forward the number already showing on the dice. Despite this Rainbow loves playing and the accompanying dialogue between the mermaids about what they see on their journey!

                Monday, February 1, 2010

                Preventing "Crafting in a Drought"

                I'm trying something different. I've filled a box full of valentines themed things for Rainbow to use as she wishes. It has punches, stickers, wrapping paper, cut up paintings, ribbons...
                In the past few months she's really starting to develop her own projects like one night when she punched around the edge of a piece of paper and threaded wool in and out of the holes.

                Since she was about 2 1/2 I've tried to have a variety of craft material (textas, crayons, useful box and collage box) and all of her tools (tape, scissors, single hole punch, glue) always available for her to access. But the good stuff (glitter, pipe cleaners, ribbons...) I've had hidden away. The problem with this is those things become more exciting and more valuable than other craft materials then when you pull them out the child goes mad and uses it all up in one sitting hence the crafting in a drought.

                Rainbow was really excited about her box of goodies. Here she is busy at work. Her craft style is very much like mine - she has several projects on the go and always coming up with new ideas. On her desk is a collage (glitter and wool). She is sitting on the floor cutting ribbons to make into bandages for the dolls. The doll on the rug was set up on the blanket on the floor before she began as she would worried she might cry. This little doll also accompanied us in the sling to the post office and the park today.

                Sunday, January 24, 2010

                Art Glass

                Many moons ago I blogged about turning an old picture frame into a felt board. At the time I said I'd share a few art activities to use the glass. Well finally here they are.

                First up the materials.
                In these pictures Rainbow is using my glass cutting board. The plastic 'glass' used in Ikea's photo frames are great. Alternatively you can use a picture frame with just glass in. Low windows are also great for the final two activities. Though glass is obviously dangerous.I must say that in the past Rainbow has just used the pane of glass but only I get to pick it up.

                All of these activities use poster paint.

                Art Glass 1: Finger Painting
                Glass is excellent for finger painting. Finger painting is about the sensory experience. The joy of moving the paint and see the patterns and the colours that emerge. Finger painting on glass heightens the sensation as the paint glides over the glass. You can get a similar effect using paint on damp paper.

                It took a long time for Rainbow to get into finger painting. You can sort of see her trepidation in her raised right hand. (Yes she's definitely a lefty.) She enjoys finger painting on glass and will often use her whole hand.

                Not all art needs to have a product but if you want one you can always take a print.


                The nice thing about prints from glass is they are almost textured.

                Art Glass 2 : Print Making
                Once the glass is covered in paint a picture can be drawn using a variety of materials - cotton buds (as shown), fingers, pieces of card (cut like a comb)...This task can include representation design or just experiential making it excellent for very little children. Experiential is also really important for kids of all ages. A chance to just focus on the sensation and getting to know the possibilities of the materials.
                We've printed on to coloured paper here which gives a different effect.
                Art Glass 3: Collaborative Painting

                This can be a collaboration between two children or an adult and a child. You sit on opposite sides of the table with the glass standing between you. I hold it at the top with my left hand. Each person has a different colour paint. You then take turns adding to a collaborative drawing with lots of talking about what you're adding. It's great in that you can add new ideas but can't disturb the other's additions as they are on the other side of the glass. You can also colour in or add patterns on top of the other person's contribution.

                Art Glass 4: Imaginative Portraits
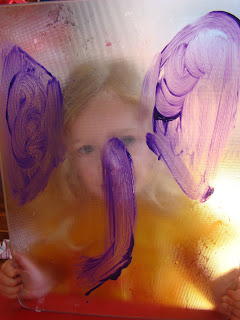
                Take turns holding the glass with your nose pressed against it. The other person then adds on facial features - real or imagined. In this case Rainbow is an elephant. When Rainbow paints for me she tends to paint on my existing facial features (eyes, nose, tusks - just seeing if you're paying attention.) Her way of doing it is probably great for extending kids who are just starting out at representational drawing.

                In the next day or two I'll show you what we're doing with these art works.